Tuesday, April 29, 2014

Coding Python (Pydev) on Ubuntu 12.04 with Eclipse Juno

A short blog post. After having installed the latest pydev on the newest eclipse juno, I found that python would not work. All the relevant buttons for python development did not appear, even though the software manager reported that pydev was installed. As such, to get both working correctly I had to do the following:

  1. Following this guide, http://www.vogella.com/articles/Python/article.htmlH as far as installing pydev. However, do not go any further as installing pydev 3.0 didnt seem to work. Niether did it work on Eclipse kepler 4.0.3. A similiar issue was reported here: http://stackoverflow.com/questions/19916925/problems-downloading-artifact-error-reading-signed-content
  2. As such, when eclipse is installed, go to help-> install new software. For the source, type: “http://pydev.org/updates”. 
  3. Uncheck “show only the latest versions of available software”. 
  4. Select Pydev for Eclipse version 2.8.2.
  5. Works!

Monday, April 28, 2014

Correcting incorrect time-offset on an Ubuntu server

Here is a quick post on a solution to an issue that affected my Ubuntu server. I noticed that me cron jobs were getting executed about a hour or two later than they were set to run at. Logging into the server and running the command "date" confirmed what I easily suspected: that the clock was off by 1h 45min.

Running the command:
$sudo ntpdate
to update the clock returned the error
ntpdate - no servers can be used, exiting.
So then I ran the command
$sudo ntpdate 0.uk.pool.ntp.org"
which returned the following:
28 Apr 14:28:40 ntpdate[23357]: step time server 109.123.121.128 offset 2311.837165 sec.
Great, I thought, problem solved. Unfortunately not. When I ran the command "date" again, the server was still off by an hour:
$date
Mon Apr 28 14:33:45 UTC 2014.
It was actually 15.33. Suspecting an issue with Daylight Savings Time (DST) was the issue, or to be more specific, that the server wasnt using it, I looked to enable it. A quick Google informed me that an Ubuntu installation gets its DST settings from knowledge of its physical location, and the time server that it is conencted to. I had already configured it to use a suitable time server with the command "$ sudo ntpdate 0.uk.pool.ntp.org", so I had to reconfigure its location from the terminal. To do this, run the following command:
$sudo dpkg-reconfigure tzdata
You will be presented with a terminal GUI. Select your locality. Then when completed, you will be greeted by the updated time: 
Current default time zone: 'Europe/Dublin'
Local time is now:      Mon Apr 28 15:33:45 IST 2014. Universal Time is now:  Mon Apr 28 14:33:45 UTC 2014.
Running "date" now confirms the corrected time:
$date
Mon Apr 28 15:33:56 IST 2014

Problem solved! 


Tuesday, January 7, 2014

Repairing intermittent wifi/wireless on a 15" Macbook Pro 2011

From reading a couple of articles on this site, you may have noticed that although I may be critical of some Apple goods, in general, I am a fan. However, there are some times that I am extremely fustrated when their hardware breaks, such as when my MacBook Pro 15" wifi decided to start acting abnormally. For reference, it have a Macbook Pro 15" Unibody Early 2011 (Released February 2011 2.2 GHz Quad-core Intel Core i7 Processor, thunderbolt, Broadcom BCM94331PCIEBT4AX wifi/bluetooth card)


The issue
After a while of use, the wireless internet dies. The signal strength indicator fan in the top right corner still indicates five full bars. Right Clicking on the icon and clicking on "Turn wi-fi off" makes the fan icon go blank as it should, but the previously connected to network remains in the list check marked, which it shouldnt. All other wifi networks in the area disappear from the list. The status at the top of the drop down box says "Wi-Fi: looking for networks".
Right clicking on the icon and clicking on "Turn wifi-off" makes the icon go blank, as it should. Right-clicking on the icon and clicking on "Turn Wifi-On" does not enable the wifi. The fan icon stays blank, which it shouldn't. The previously "connected to" network remains check marked, but there is no connection to the internet.
Putting the laptop to sleep with the lid and waking it again results in five faded bars, but now no wifi networks can be found, and there is no connection to the internet. The issue occurred round once a day at the beginning. By saving my work and rebooting the laptop, the issue has been manageable. However, it became unmanageable when it occurred more and more often to the point where I had to save my work reboot my laptop every 1-2 hours of use.

What I tried to do to repair the issue

  1. Reboot the laptop. A temporary solution is to reboot the laptop, in which the wifi performs as it should until the issue occurs again.
  2. Use a USB dongle. A semi permanent solution was for me to buy a Ralink usb wifi adapter, that worked fine but was not ideal. It felt a bit ridiculous and cumbersome to have to use a $10 usb adapter to repair a Macbook Pro that cost $2000.
  3. Connect to a different wifi network. This did not work. The issue occurs when connected to other wifi networks, such as my parents one at home. This hinted that it was not a wireless router issue.
  4. Reset PRAM, NRAM, etc. This was only a temporary solution, as was just simply rebooting the laptop.
  5. Deleting my Airport settings files. Again, this was only a temporary solution, bus so was simply rebooting.
  6. Wiped the harddrive and installed Mountain Lion. The issue remained, even with a clean installation with no restoration of my old settings from TimeMachine. The issue was the same when I installed Lion, and Mavericks. I even noticed the same issue once with the wifi when I booted off just the OSX installation disk. As such, I believed that the the issue is hardware related.
  7. Visual inspection of the hardware. I took off the bottom cover of the laptop to see if there are any visually obvious loose connections, but there are none.
  8. Took the laptop to an authorised Apple Repair Center. They did nothing. As it was an intermittent issue, they said that the wifi was working fine when they ran their DVD of hardware tests. As far as I know, they don't do any long-term tests, even though I had requested them to do so. They blamed the wireless router (which I knew was not an issue, see above) and mu wifi settings (which I also knew was not an issue, see above).
  9. Replaced the wifi card. This did not work. I bought a new Broadcom BCM94331PCIEBT4AX for around $35 off eBay. Following a guide on ifixit, http://www.ifixit.com/Guide/MacBook+Pro+15-Inch+Unibody+Early+2011+AirPort-Bluet ooth+Cable+Replacement/5887 I replaced the card easily enough. It was just around 10 screws in total, easily manageable in an hour if you take your time. Unfortunately, the issue returned again after a few hours of use. 
  10. Replaced the motherboard, and the screen. I assume means that the wifi antennas got replaced. This did not work. On an unrelated issue with the graphics card, Apple agreed to replace the motherboard, LVDS, and LCD screen out of warranty (really good of them). Unfortunately, their authorised repair center took nearly 6 months to do the repair (again, they were a bad representation of Apple). Unfortunately, the wifi issue returned once again after a few hours of work.


What repaired it in the end
Finally, in a last ditch attempt, and as it seemed to be the only part in the laptop not replaced (including software), I bought a replacement wifi/bluetooth cable off ebay for around $30. This worked! It has been going strong now for nearly three weeks with no drop in wifi. It was pretty expensive for a simple black ribbon cable but I am glad that it worked. There was no visual damage to the old cable, but I suspect myself that the bottom cover may have pinched the cable against some edge near the motherboard, thus causing the intermittent drop-off in wifi.

Update 20/01/2013 : I have re-opened the laptop to inspect the location of the ribbon cable (Figure 1). In (Figure 2) you can see the point on the rear of bottom cover (2) that places pressure on the end of the ribbon cable. You can see that there is a visible imprint on the plastic foil covering the back of where they are in contact. Due to the level of imprint and its location, I suspect that this causes excess pressure on the cable connector when the laptop receives knocks from the underside.

Figure 1: The faulty macbook wifi cable is shown in (1). The point on the back cover that I suspect may have been putting too much pressure on the ribbon cable is located at (2)

Figure 2: The point on the rear of bottom cover (2) that places pressure on the end of the ribbon cable. You can see that there is a visible imprint on the plastic foil covering the back of where they are in contact. Due to the level of imprint and its location, I suspect that this causes excess pressure on the cable connector when the laptop receives knocks from the underside. 


Thursday, April 11, 2013

Repairing a charred/burned/broken cable on an Apple Magsafe charger

I have spoken in a previous blog post about some issues with Apple hardware design 
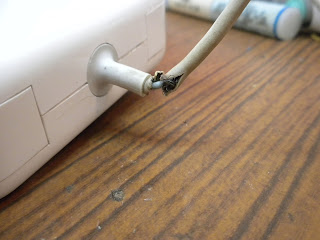
here. To briefly recap, it is of my beleif that in general, Apple hardware is very well designed. However, they often overlook functionality in favour of form, sacrificing important aspects such as durability so that "it looks nice". A good example of this is the Magsafe adapter. In a bid to improve aesthetics, Apple shortened the rubber strain-relief grommet that protects the power cable from fraying at the charger end, and the connector end to the laptop. The metal strands inside the cable gradually begin breaking from normal use until eventually, with only a few strands left carrying a large amount of current, the last few strands overheat resulting in a burning smell and the the connection breaking completely. After Apple received many complaints with regard to this problem with the original Magsafe adapter, they extended the length of the rubber on the grommet to improve the durability of the cable. However, in me experience, this wasnt enough: the cable still ends up fraying, and the hardening of the rubber in the grommet over time only aggravates the issue. They also introduces a replacement program, details of which you can find here. However, this does not cover anywhere outside of the United States.

In case you find yourself in a similar situation as I was, here is a short guide on how to repair the cable on your magsafe adapter, without having to fork out the $80 for a new one. 

First off, you will need a large pliers, a high wattage soldering iron (I used a weller 75watt), solder, some cable ties of various sizes, a drill and a small drill bit, some glue and a sharp knife. 

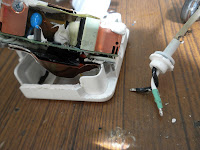
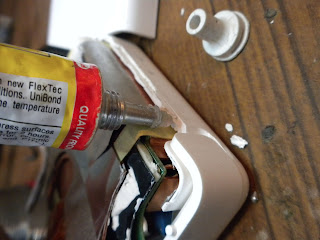
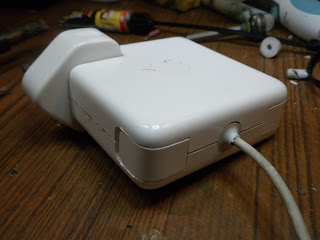
1. Remove the plug from the Magsafe adapter. 

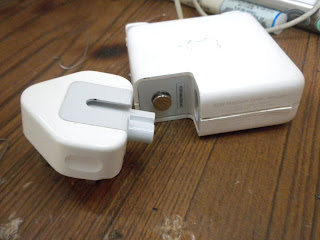
Removing the plug from a Magsafe adapter
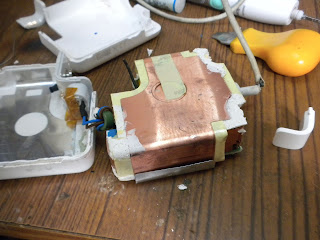
2. Apple have ultrasonically welded the two plastic shells that cover the adapter. They do this by vibrating the two halves against other at such a high rate to melt the plastic at the junction and thus sticking them together. This results in the Magsafe adapter being pretty difficult to open without making some messy cuts in opening it up. So here is a quick tip on opening them up: Flip open the cable tidy arms and insert the pliers into the gap. Then slowly and firmly open the pliers pushing the two parts of the case apart in the process.

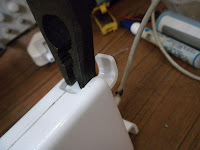
Insert a pliers in the gap for the cable tidy 
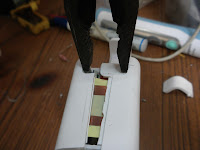
Open the pliers, splitting the case open 

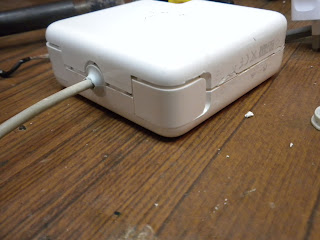
Voila! An opened magsafe adapter with very little tool marking or scratching to the plastic.

Opened Magsafe adapter

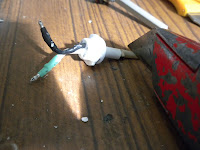
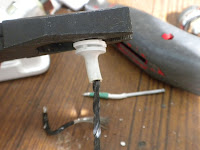
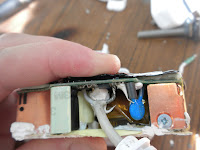
3. Now, bend some of the plastic and copper shielding back around where the cable meets the circuit board to reveal two large solder points. Make a note of where the black cable and the white cable are soldered into the board. To help you, the board should be marked "GND" near the black cable. 

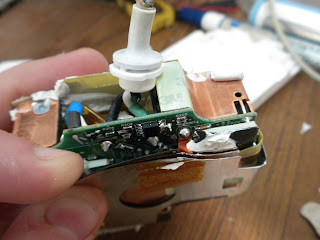
Solder points for Magsafe cable. White is positive, black (GND, cable shield) is negative


4. Using a high power soldering iron, desolder the two points and gently pull the cable from the board. You may find it easier to solder the points by removing the shielding from the circuit board. I left it on here. 
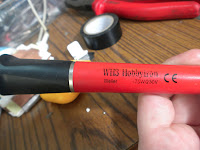
Weller 75w iron
Cable successfully desoldered from Magsafe adapter


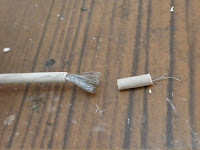
5. Taking the cable, use a sharp knife to make a cut after the break in the cable. 

Cutting the good cable from the damaged cable
The damaged part ad grommet removed from the cable


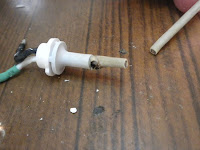
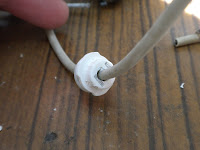
6. Now, using the pliers again, pull the old black wire, and the white wire out of the grommet.  You will be left with a hole in the grommet as shown below. 

Removing the wires from the damaged part of the cable
The grommet, with the outside insulation of the cable left


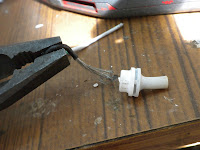
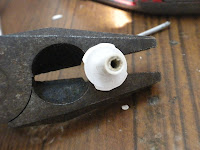
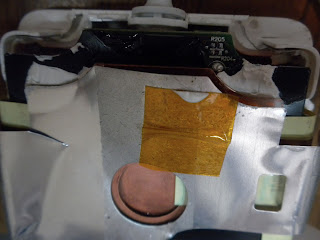
7. Now, drill a hole all the way through the grommet removing the old cable and some of the grommets plastic along the way. You should make the hole large enough to pass the cable through, as shown below. 

Drilling the outside insulation of the damaged cable from the grommet
Weaving the good cable through the now cleared hole in the grommet


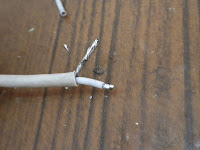
8. After you have passed the cable through the grommet, it is time to prepare the cable for soldering back to the board. Using the sharp knife, remove about 20mm of rubber insulation from the cable. Further remove about 3mm of insulation from the inner white wire. Then tin the ends of both cores using the soldering iron as shown below. 


Removing some outside insulation from the good cable
"Tinning" i.e. applying solder to the exposed positive and negative cable.
 A good tip here is to twist the ends before soldering. 


9. Now, carefully solder both wires back to their respective points on the Magsafe circuit board. 

The ends of the cable correctly soldered into place
on the circuit board. 

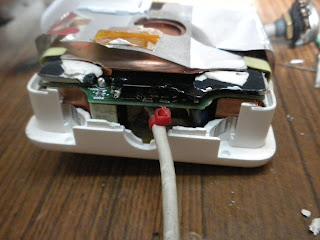
10. Place the circuit board back into one of the plastic shells of the cover. If you have done everything correctly so far, the adapter should be able to charge your laptop as this stage. If you are comfortable testing the adapter while the cover is off, do so now. Or else continue with the guide. 

Placing the circuit board back into one of the covers


11. Using a small cable tie, wrap it around the cable as tight as you can just inside the plastic cover. This is done so that the cable cannot be accidentally pulled out of the adapter during use. 

Adding a cable tie to the good cable


12. Run the plastic grommet down the cable back into position in the plastic shell.

Placing the grommet back into the shell

13. Using some glue, make a small bead all around the perimeter of the shell. Use the glue sparingly, but cover all the edges where both halves meet. 

Adding glue to the edge of the shell


14. Press the second half of the plastic shell back onto the Magsafe adapter. Wriggle the two halves to get them into place properly, and then firmly press the two halves back together. 

Squeese the two halves together to make sure that the glue spreads. 


15. Using some large cable ties, wrap them around the Magsafe adapter and tighten them using a pliers. You will need the two halves to be very tight together as the glue dries, or else the two cable tidy arms can fall out.

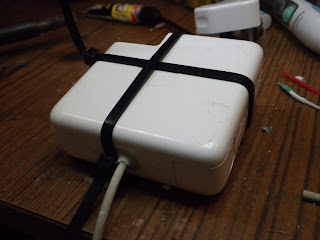
Adding cable ties around the adapter to make sure that they glue together properly.


16. When the glue has dried, remove the cable ties. You should be left with a working adapter that hardly looks like it was opened at all!

The finished, now working, adapter. 


Unfortunately I accidently ripped some of the rubber off the grommet as I was drilling through it, so go easy on that drilling! I have also repaired a few adapters where the cable has broken and burnt on the connector end. This is a slightly more difficult repair, but I can make a guide if requested.  

Saturday, March 23, 2013

Repairing an iPad 2 that wont charge

On general, I have found any Apple hardware that I have used as pretty robust little things. I am notorious for not taking care of my stuff: my iPhone is kept in the same pocket as my car keys and is coverless, my iPad is thrown in my schoolbag with my charger and bottles of drinks, and my macbook, being my pride and joy, has taken more knocks than Rihanna. In general, I dont believe that I should have to modify these devices with protective covers, or adjust my ways by changing how I transport them. To me, that would be a consequence of bad design of the product. This is one of the reasons I enjoy Apple devices as they are normally pretty robust to the way I use them.

However, every now and again one of them breaks or malfunctions due to the way that I use them. In this case, my iPad. I do a lot of programming on my iPad. In fact, it is the only way that my iPad gets used: It is continuously plugged into my laptop for developing apps with Xcode. As such, the battery is nearly always kept at 100% charge and is never power cycled. This leads to a problem, which (in my opinion) is caused by the following:

Back in the NiCd days of batteries, which were used in everything rom laptops telephone and power tools, batteries had to be charged fully, then drained fully before the next charging to give the batteries a long life. If you did not do this, they suffered from what was called a "memory effect" where crystals would grow on the anode and result in a diminished capacity of the batteries.

The li-ion batteries of today do away with this memory effect. No longer can these crystals grow to shorten the lifespan from intermittent charging. The batteries can be pretty much charged when and for as long as you like without a significant shortening of their lifespan. Another battery technology that was introduced around the same time was battery management circuitry. These little chips sit in the battery packs and record how much charge goes into the battery during charging, and how much charge goes out of the battery while it is in use. This is useful, as when the chip detects that the battery is taking in no more current while it is in charge, it knows that the battery has reached "100%" charge. Similarly  when the battery cannot produce any more current during use and the voltage drops, it has reached "0%" charge. By keeping a running tally of how much current has left the battery since the last charge, the battery can report to the device how much charge is left in the battery. As such, this technology enables the device to inform you pretty accurately of what percentage charge is left on your device.

The battery management circuitry can also do some other neat tricks such as faster charging times. By knowing that the battery is near 0% charge, it knows that it can take a large amount of current in a short time to take it close to the 90% level, and then reduce the current to "trickle charge" it closer to the %100 mark. This lowers the charging time of the battery while keeping the battery safe from overheating.

However, this technology is not without its flaws. It can re-introduce a similar problem to the Ni-Cd "memory effect". When the battery management's running tally of the battery charge becomes out of sync with the actual charge that the battery, it can lead to some strange results. It can refuse to charge the battery, thinking that the battery is at full capacity already, when the battery is not. This can happen when it cannot measure the complete discharge or charge current that the battery can take. This can be caused by the device being left on charge for long periods of time, keeping the battery is at 100% indefinitely.

This is what happened to my iPad. On one or two occasions it would indicate a certain charge level, say for example "4%". No type of charger would bring it past "4%". All I could do was unplug it and watch the level drop as I used it. No matter if the level was at 3% or 2% or 1%, plugging in the charger would say "Charging", but the percentage level would not increase.

To repair this, I assumed that I would have to let the battery drain itself completely. COMPLETELY. Not at the "you have 10% battery left" level, and not at the "red battery warning symbol" level (see first image). This iPad had to be drained so much that it would be unresponsive when I clicked on the home button or the power on/off button.  This had to be done so that the battery management circuit would know for sure that there was 0% charge left in the battery by the large drop in voltage.

So I had three options. One was to leave the iPad in a drawer for a few days until it drained itself. However, this was not possible as I neeed it for work the next morning. The other option was to open the iPad and drain the battery directly using a suitable load. However, ipads are very difficult to open without damaging the glass display. The final option was to keep pressing the power button so that the screen would light up and display the red battery symbol, and keep doing this until the ipad hadn't enough power to do it anymore.

Specs of motor from microwave oven
Motor from microwave oven
Now, I could either keep pressing the on/off button myself and go mad from the boredom (this could take hours), or I could come up with an automatic way. Choosing the latter, I needed a motor that rotated at a slow enough rate to press the power button at 5 -10 second intervals.

I broke apart an old microwave oven and salvaged the 220v motor that rotates the glass plate around inside. Taking the necessary safety precautions, I soldered a lead and a plug to the motor and insulated the contacts it using some polymorph plastic. Using copious amounts of insulating tape, I mounted the motor just above the power switch in such a way that the teeth of the small gear on the motor would press and depress the power button as it rotated around. Once I had it taped in the correct position, I left the ipad and the motor running overnight. You can see a video of the iPad and motor in action here. Note that I also taped down the home key with some insulating tape and a small coin, hopping that this would also aid the discharging process.


The microwave oven motor in
place above the power on/off switch

When I picked up the iPad in the morning, the iPad was as dead as a dodo. No amount of clicking the home key or the power on/off key would wake it. I plugged the ipad into the official charger and sure enough, about 30min later, the charging symbol came up on the screen. Then the iPad woke, and the charging battery percentage began to climb! I was delighted. To make sure that everything was working as it should, i put the iPad through a few charge cycles before using it again as normal.

Just to note, Apple warn you on their website to discharge your iPad and charge it fully at least once a month. I will be taking heed of this warning in future.


The motor successfully turning the iPad on and off continuously. 


Repairing an Oxygen/Lambda sensor on a Toyota Yaris

The orange engine error light
For the last year or so an orange engine error light came up on my 2001 1.0L Toyota Yaris. Even though the car seemed to run the same as normal, and was properly serviced, the small orange light kept nagging me glowing in the corner of the dashboard console while I was driving. Not wanting to pay for a garage to repair the fault, I decided to try and tackle the issue myself. 

CAN<->Bluetooth adapter
and Torque Pro running on a
Google Nexus
The orange light lights on the console whenever the vehicles Engine Control Unit (ECU, the cars inbuilt computer) detects a fault with the vehicle. To find out what issue the light was indicating, you have to read the error code produced by the ECU on the CAN bus of the vehicle (The CAN bus is akin to a USB network that traverses through the vehicle). To help mechanics read these fault codes, vehicle manufacturers leave a connection point to the CAN bus somewhere within easy access in the vehicle. On the Yaris this is located at the top of the drivers footwell. This connection point is a large connector called a OBD connector. Mechanics can buy CAN to USB converters to connect the vehicle to a PC and using suitable PC software, read the error code off the vehicle. These connectors and software can run anywhere from a couple of euros for the most basic generic adapter with free software, to a couple of thousand for standalone readers that are specific to particular brands and error codes of vehicles. 
The CAN<->bluetooth adapter (top of footwell) with the Nexus pad

As I wanted to repair this fault the cheapest way possible, I went onto Ebay and bought a CAN to Bluetooth adapter for about 15 euros. I also downloaded a great piece of software called "Torque pro" for my google Nexus Android pad that can interface with the adapter for reading and resetting error codes. 

Plugging in the adapter into the OBD connector and pairing it with the Nexus, I was able to run Torque Pro and read the error code. The code that was shown was  "P0141 - Powertrain O2 Sensor Heater Circuit (Bank 1 Sensor 2)". Googling this error code informed me that the Yaris has a two 02 sensor on the exhaust of the vehicle. One sits before the catalyst converter, and one after the catalyst converter to make sure that it is doing its job correctly. These sensors have an inbuilt heater that heats the sensor up to its correct working temperature when the vehicle is started. In my case, the sensor after the catalyst had burnt out its heater circuit leading to the error reported by the ECU. Using the "Haynes repair manual" for the toyota Yaris, I was able to successfully locate and remove the broken sensor. After another browse on ebay, I was able to source a second hand sensor for 30 euro, a much cheaper price than the 150 euros I was quoted for a new one from a toyota dealership. I replaced the O2 sensor and powered up the engine. 
Resetting the error codes after the fault has been repaired
Reading the error codes


A error of "P0141 - Powertrain O2 Sensor
 Heater Circuit (Bank 1 Sensor 2)"
 is shown in Torque.  
The tools of the job
The new 02 sensor is fitted in place
At first I was confused to still see the orange error code on the console of the vehicle. However, after a bit of playing around with the app on the nexus tap, I was able to find a menu to reset the error codes on the vehicle. After turning the ignition of the vehicle on a off again, I was happily not greeted by the orange warning light. So all in all the whole operation cost me around 60 euros, as I just had to buy the CAN adapter, the android app, and the replacement O2 sensor. Not too bad a saving if I say so myself. 


No more warning light!


Saturday, July 14, 2012

A guide on what to check on an second hand iPhone before buying.


After trading in iphones and iphone repairs for a few years, I have often come across some phones in mint condition, and some right lemons. As such, ive compiled a list of a few things to keep an eye out for when you go to buy an iPhone second hand, in particular for when you are buying an iphone off a dodgy lad in trekkies in an even dodgier neighborhood.


Tools you will need to bring with you:

  1. A sim card on a network that the phone will accept (if the phone is unlocked, you can bring any network sim card). 
  2. A sim card removal tool, such as a paperclip or a thumbtack. 
  3. Optional: A small torch
  4. Optional: A second iphone, to enable a "wifi hotspot" with. 
  5. Optional: A set of headphones
How to check if the iphone is functioning fine (these are in descending order of importance):
  1. Put in a sim card (make sure its a micro sim card for the iPhone 4) ring someone, and ask them to ring you back. This tests the ringer, speaker, microphone, network signal, and most importantly, if the phone isnt blocked. 
  2. Hold your finger down on an icon to move it, and move it all around the screen. If it springs away from you at the same point repeatedly, then the digitizer may be damaged.
  3. Take a picture. This checks the camera.
  4. Turn silent switch to speaker and then switch it back to vibrate. If the phone doesn't vibrate, then either the vibrator is bad or the switch is bad.
  5. If available, check to see if wifi is working by making a search for networks nearby. If you have a second iphone, you could enable "hotspot" and see if you can find that.
  6. Press the on/off button to see if it wakes and goes into sleep to ensure that the button is working correctly. 
  7. Press home button to go to SpringBoard (the normal background) a few times to ensure its working correctly and isn't stuck.
  8. Check the water damage indicators with a small torch: http://support.apple.com/kb/ht3302
  9. Plug in headphones, and ring someone, and have a quick conversation. This checks the headphone jack. 
  10. Change the volume up and down. Check if the volume icon changes accordingly on the screen. This checks the volume buttons. 
  11. Remove any screen protector or case. Look at the cosmetic condition. Look for scratches on screen, back, scuffing on the trim, cracks near earphone jack and charger.